In this AutoCAD step-by-step guide, you’re going to learn about the basics of AutoCAD, how to use AutoCAD, and how to sketch 2D and 3D drawings by using commands. If you are a beginner, then it will help you learn about the basic features and functions of the software.
Introduction to AutoCAD
AutoCAD is the most popular and powerful software for Computer-Aided Designing and Drafting software applications. You can easily edit, create 2D and 3D drawings of objects like homes, buildings, floorplans, equipment, and commercial structures by using AutoCAD. You can also design electrical circuitry and generate 3D printing files used in 3D construction works.
Step 1: Install and open the AutoCAD Software
Create an Autodesk account for AutoCAD
The AutoCAD software is developed by Autodesk Inc. You have to sign up and create an Autodesk account on their website to download and install the software. The price for a business or professional software license is high, but if you are a beginner, you can go with their free student version.
Install the software on the device
After creating an account, you can download the software and install it on your device. The minimum system requirements for running the software smoothly on your device are:
| Operating system | Window 7, 8, 8.1, 10. |
| Processor | 2.5-2.9 GHz processor. |
| RAM | 2GB (4GB recommended) for 32-bit, 4GB (8GB recommended for 64-bit. |
| Hard disk space | 6GB of free space for installation. |
| Display resolution | 1024 x 768 (higher recommended). |
| Display Card | Windows display adapter capable of 1024 x 768 with true colour capabilities. DirectX 9 or DirectX 11compaint card recommended. |
| Browser | Windows Internet Explorer 11 or later. |
| Network | .NET Framework Version 4.5. |
Step 2: Introduction to AutoCAD User-Interface
After installing the software, when you open and start the AutoCAD, you’ll reach a screen called Zero screen. It’s also known as the AutoCAD user interface. The interface consists of the Get Started panel, Recent Documents panel, and Notification panel. The Recent Documents panel shows you recently saved drawing. You can connect & sign in to your account in the Notification panel.
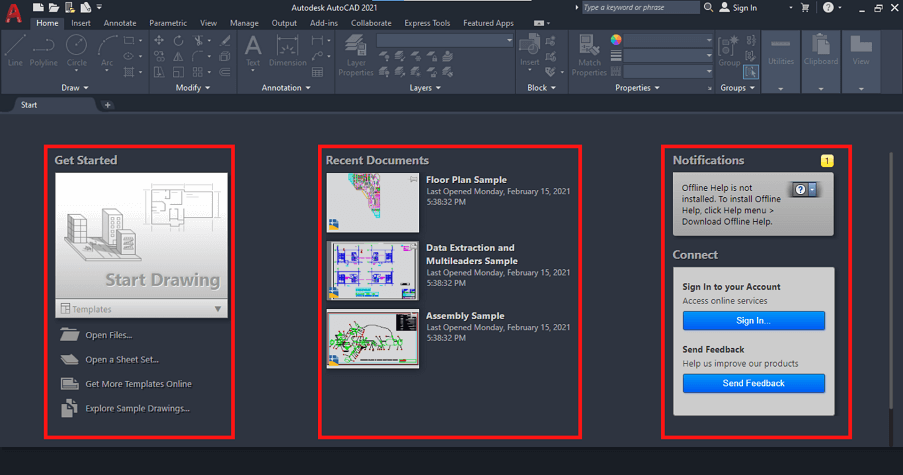
Start New Drawing
From Get Started panel, You can start new drawings by selecting the template for drawing from the templates option. You’ll also see an open file option to open saved files, open a sheet set, get more templates online, and Explore sample drawing options on the Get started Panel.
How to select Default Templates
You can choose the template to select the units and colour of your drawing. The default templates available are:

- acad-Named Plot Styles.dwt: This template is used for drawings in the imperial unit system (feet and inches). The drawings can be printed in white and black color.
- acad-Named Plot Styles3D.dwt: The template is used for designing 3D objects in the imperial unit system (feet and inches). The drawings can be printed in white and black color.
- acad.dwt: This template can be used for 2D drawings in the imperial unit system (feet and inches) for printing them in different colors.
- acad3D.dwt: It helps to create 3D objects in the imperial units (feet and inches). These drawings can be printed in different colors.
- acadISO-Named Plot Styles.dwt: we can create drawings in the metric unit system (millimeters) by using this template. The drawings can be printed in white and black color.
- acadISO-Named Plot Styles3D.dwt: The 3D drawings can be created in the metric unit system (millimeters) and can be printed in white and black.
- acadiso.dwt: The drawings can be created in metric units and can be printed in different colors.
- Tutorial-iArch.dwt: This template is used for creating architectural drawings in imperial units (feet and inches).
Step 3: Introduction to AutoCAD Workspace
After selecting the template and starting a new drawing, you’ll come to the AutoCAD workspace screen. Workspace is basically an arrangement of tools and pannels. The workspace screen is divided into several parts, such as the Title bar, Quick Access toolbar, Ribbon, Compass, Application Menu, Status bar, Navigation Bar, Drawing area, and Command window.
Application Menu
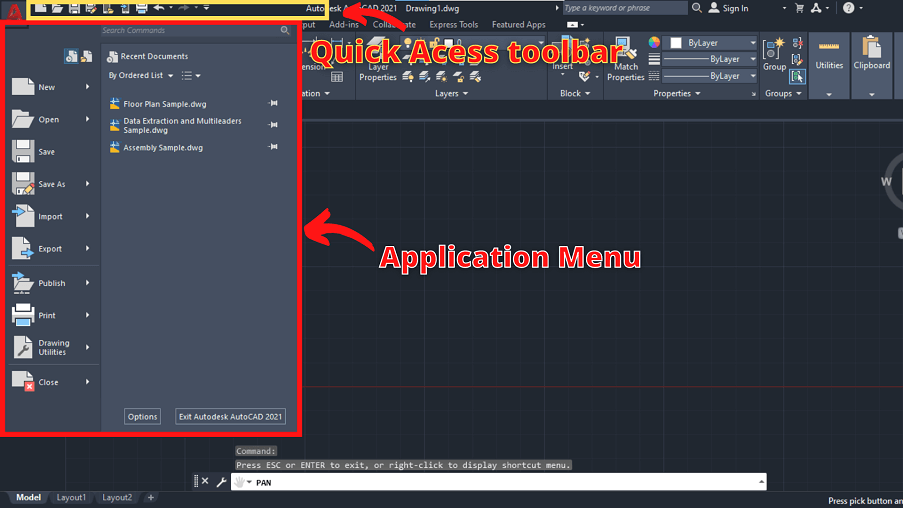
In the Application Menu (A menu), you have the option to open new or existing files, Save & Save As options, Import & Export, Publish, and print options. You can also search for AutoCAD commands using the search command box in the Application Menu. The Quick Access toolbar has commonly used similar icon options.
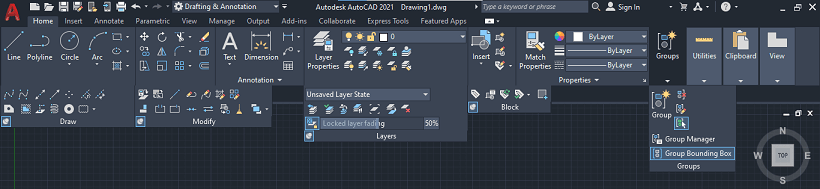
Ribbon
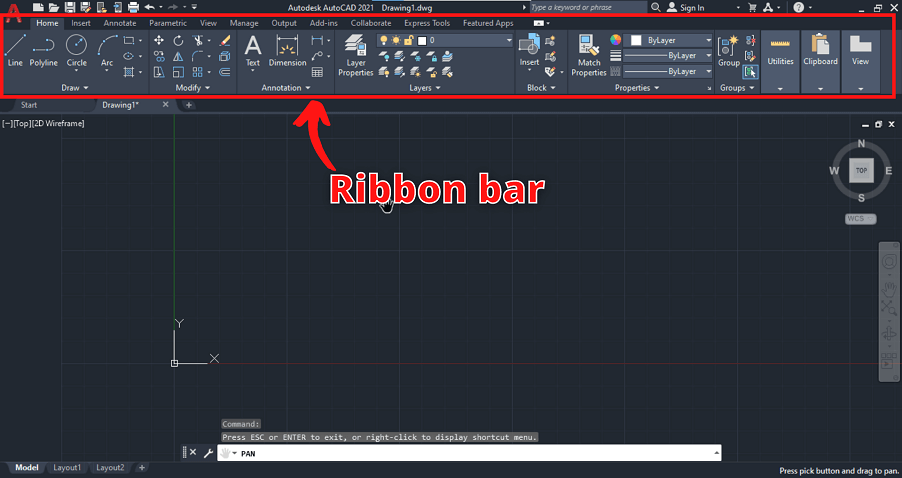
The Ribbon bar is the most important bar of the AutoCAD workspace. It consists of all the Important tools used in drawings. The ribbon is divided into drawing tool panel, Modify tab, Annotation tools, Express tools, Layer panel, Properties, and Group bar.
Drawing Area
The drawing area is one where you’ll draw your project. The Drawing area consists of DrawSpace, UCS (Universal Coordinate System), Navigation bar, Navigation wheel (or compass), and View Cube.
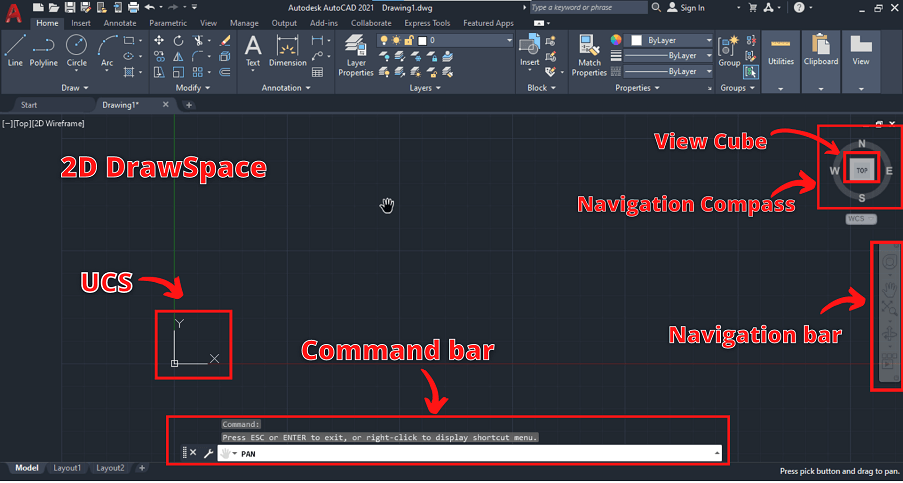
UCS is a moveable coordinated system that establishes XY planes. UCS means you can draw projects using the x-axis & y-axis. The AutoCAD drawings are created using the UCS system. You have to enter the UCS command to set up the DrawSpace before starting any drawing.
Navigation Compass and View Cube are used to set up the orientation or view of the drawing area. You have to click on the edges, faces, and corners of the View Cube to enter the desired view.
The Navigation bar consists of the Hand symbol to move the DrawSpace, the Orbit tool to orbit the DrawSpace, and Zoom in & out options.
Command Bar

At the bottom of the drawing area, you’ll see the Command bar. To start the drawing work, you can enter the commands by typing them directly in the Command bar. It also shows proper details of the command and displays tips to execute the command correctly. To stop any command, you have to press Esc on the keyboard.
The most commonly used commands
- L command: Type ‘L‘ in the command bar, then press “Enter” to execute the command. It will create a simple line in the drawing.
- M command: Type ‘M’ in the command bar, then press “Enter” to move the objects.
- UNITS command: This command is used for setting the drawing units and angular dimensions.
- REC command: This will create a rectangle on the DrawSpace.
- C Command: Type ‘C’ in the command bar, then press” Enter” to create the circle.
- CO command: It is used to create copy of the objects.
Status bar

Below the command bar, you have the Status bar with small icons. The status bar consists of cursor location, Grid snap icon, polar tracking, object snap, workspace icon, and drawing tools that help you in drawing work. You’ll get quick access to some of the most commonly used drawing tools from the status bar.
Step 4: How to start Drawing work
Set up the AutoCAD workspace

After opening the workspace, you have to set up the DrawSpace. To set it up, you have to go to the Customize Quick Action Toolbar and click on the WorkSpace option. It will show you three options Drafting and Annotation, 3D Basic, and 3D Modeling.
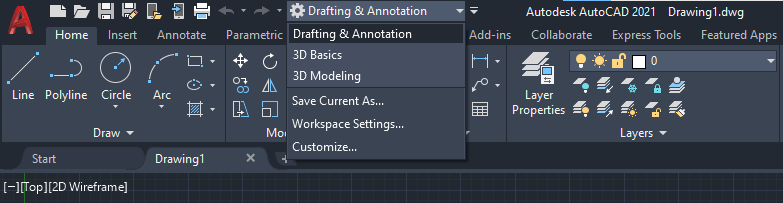
To add the workspace for 2D drawings, you can go with the Drafting and Annotation option. If you want to create a 3D drawing, you can change it to either 3D basics or 3D Modeling. It will allow you to use all the 3D tools that you need to create your 3D objects
Select the Units of the drawing
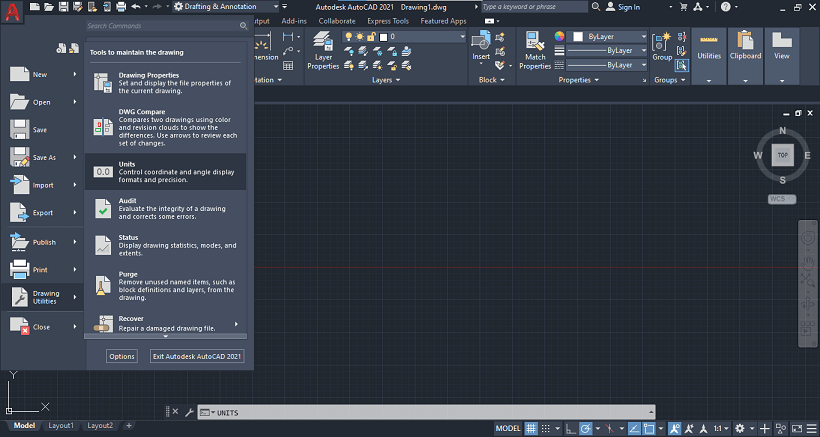
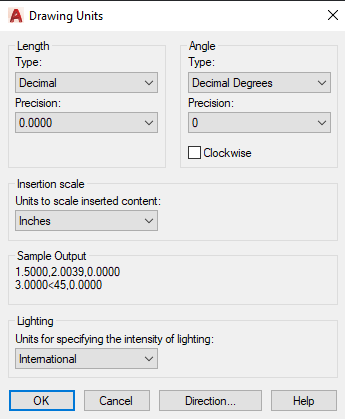
To change the units of your drawings, you can either put the ‘UNITS‘ command in the command bar or go to Application Menu (by clicking on a big red A) and select Drawing Utilities. It will open the Drawing Units panel, where you can select units of the drawing.
Sketch the drawing of the object
Before going to sketch, you can set up the UCS on the DrawSpace by typing the ‘UCS’ in the command bar and then pressing Enter. You can also use the snapping option to enable the Grid View by pressing F9 on the keyboard to make your drawing work easier. You can use various commands and drawing tools in the Ribbon bar to draw the object.

Save your drawing
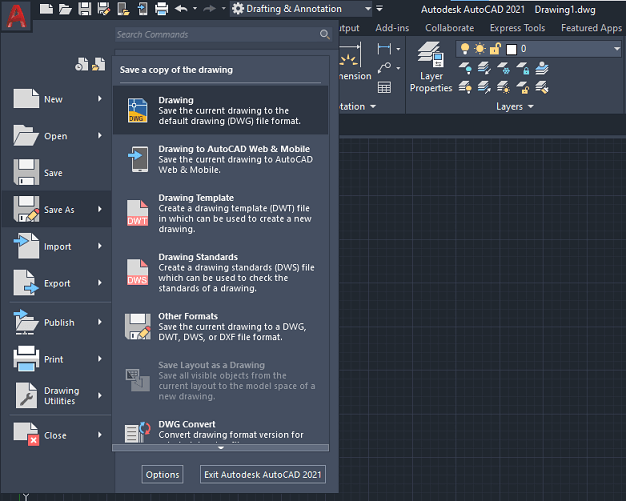
To save your drawing work, Click on the Application menu (A menu). Select the Save As option and choose the drawing. Your drawing work will save as a DWF file as it is AutoCAD default format.
Now I hope after reading the above article, you have a basic understanding of how to use AutoCAD and how to sketch 2D & 3D drawings.